|

Custom Search
ICS Host Computer Setup in Windows XPICS Host Computer Setup in Windows XP! You need to enable Internet Connection Sharing feature on ICS host, so that it can share Internet connection with other computers. Here are step-by-step instructions on how to do it: 1) Go to Start, click Control Panel. 2) Control Panel window will appear. Double click on Network Connections. 3) Network Connections window will appear. Right click the Local Area Connection that connects to Internet, then click Properties.
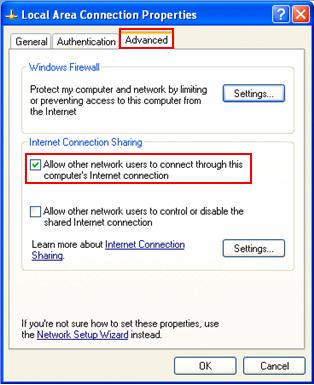
4) Local Area Connection Properties will appear. Click Advanced tab, tick the Allow other network users to connect through this computer's Internet connection check box.
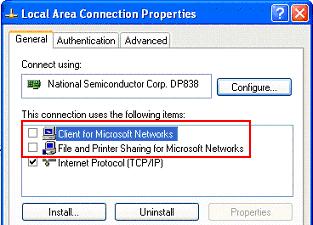
Note: Only System Administrator can access Advanced tab. Note: Please make sure you enable ICS on the connection that connects to Internet. Note: If you want other network users to enable or disable the shared Internet connection, tick the Allow other network users to control or disable the shared Internet connection check box. This option is useful if you use modem dial up method to access Internet. For cable/DSL connection user, this option is better disabled and centrally managed by system administrator. Note: Tick Establish a dial-up whenever a computer on my network attempts to access the Internet if you use modem dial up method to access Internet. This check box is only available on the dial-up connection’s properties. Note: You should not use this ICS feature in a network with other domain controllers, DNS servers and DHCP servers. Those servers would affect the Internet Connection Sharing from working properly. Note: If you have 2 or more home network connected by ICS host computer, you need to bridge those network for accessing shared Internet connection. For more information, read this network bridging in Windows XP. 5) You should untick Client for Microsoft Networks and File and Printer Sharing for Microsoft Networks check boxes on shared connection properties. This approach would better secure the network and won’t accidentally expose your home network resources to Internet. Firewall is also highly encouraged to be enabled on ICS host computer. Click OK at last.
6) You will see there is a hand supporting shared network connection.
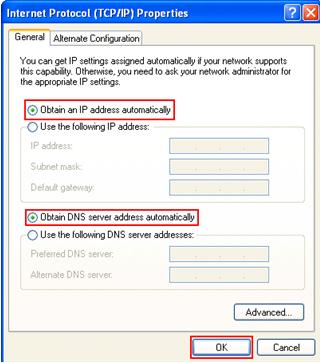
7) After enabling ICS feature, the network card connected to the home network would be assigned a static IP address 192.168.0.1 with netmask 255.255.255.0. The ICS host will act as a DHCP server assigning other IP addresses in the 192.168.0.x/24 range to other client computers. 8) In order to access Internet, client computers (Windows XP, 2000) should configure TCP/IP on their local area connection to obtain an IP address automatically. Then those computers will be assigned IP address in the 192.168.0.x range and able to access Internet through this ICS host computer.
Related Readings: Internet Connection Sharing in Windows XP
|