|

Custom Search
Ethernet Network Card Configuration in VistaIf you plan to do Ethernet network card configuration in Vista and add it to existing Ethernet home network, you have come to the right page. You will know how to do it after reading this article! Network Card Driver InstallationNetwork card driver installation is a must! Without installing the driver, your network card just won’t work. If you plug in the network card the first time to the computer and boot up the Windows Vista, the system will detect new hardware and prompt you to install the driver, you can then use the driver installation CD or the driver downloaded from vendor website to finish the installation. You can then check the driver status to make sure it works well after the driver installation. Note: Don't forget to connect your computer's network card to router's LAN port with network cable. TCP/IP ConfigurationThis is the most important part of network card configuration in Vista. You must configure the network card, so that this computer can communicate with other computers or network devices. You will need to have TCP/IP protocol and other Windows network items installed in order to make it work correctly.1) Go to Start and right click on Network and then click Properties. 2) Network and Sharing Center window will appear, then click Manage network connections.
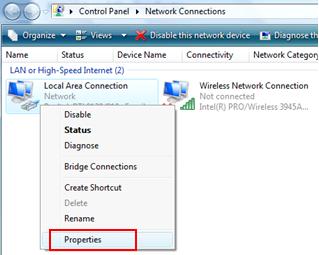
3) Network Connections window will appear. Here you can right click on the network card that you wish to configure and click Properties.
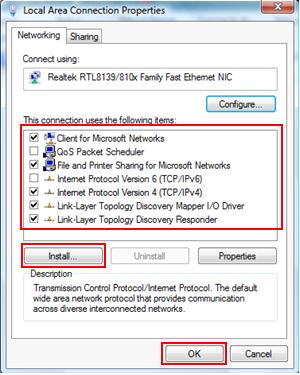
4) In the Local Area Connection Properties, you need to have following items installed and enabled: Client for Microsoft Networks – Allow your computer to access resources in a Microsoft network. File and Printer Sharing for Microsoft Networks – Allow your computer to share files and printers in Microsoft network. Internet Protocol Version 4 (TCP/IPv4) – The protocol that enables your computer to talk to other computers in your network. You need to specify IP address, netmask, gateway and other network information for it to work correctly. Assign the IP address by following your network design, and make sure the IP is unique. Note: Somehow the Internet Protocol Version 6 (TCP/IPv6) is still not commonly used. If your computer is in IPv6 network, you can select Internet Protocol Version 6 (TCP/IPv6) to configure IPv6 address. Link-Layer Topology Discovery Mapper I/O Driver and Link-Layer Topology Discovery Responder - Used to discover and display your home network map. Check this on how to enable Network Discovery in your network. If you don’t have those specified items installed, click Install… and follow the instructions to install the items which you missed. Finally click OK to close the window. At this moment, your Vista computer should be connected to home network. Try to ping other computer or router IP.
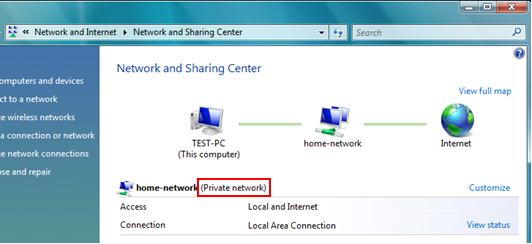
Network Location TypeOnce your computer is connected to home network, you are advised to set the Network Location Type to Private as this computer is part of home network or private network. Also can say that your computer is connected to trusted computers with Network discovery and file sharing enabled by default. Check out this article on how to change Network Location Type.
Assigning Computer Name and WorkgroupAlso each computer in your network must be assigned a name and workgroup, so that it’s easy for your identification. Follow step-by-step instructions here to set computer name and workgroup in Vista. That’s all the network card configuration in Vista, after that you can proceed to do simple file sharing, password protected file sharing or printer sharing if you like. If you face network connectivity problem, check out how to use ping to troubleshoot the problem. Next: Implementing Network Security
Return to top of "Ethernet Network Card Configuration in Vista"!! |